
Zip to the present and the current problem with the great deal knobs.


This is an OLD photo of our kitchen, but the only one I could find that showed all of it. We recently repainted a warm yellow (which ended up the same tone as the cabinets, which is why painting the cabinets is next on my list). It is large and has LOTS of cabinet space, so it would be expensive to replace knobs.
But recently while out at my local Goodwill, I found bin pulls from Target marked down to a package of 6 for $1.98, then I spied another package of 6 for $2.98. The cashier, though after looking at both, without my even asking, rang them up both for $1.98 each! So at least I could change the drawer knobs....
The old knobs were a single screw and the new knobs were double screws, so a little modifying needed to be done. I took all the drawer fronts off the drawers and removed the old knobs.

(It won't let me rotate this photo!) , anyway here are the old knobs, if anyone is interested I will be happy to mail 12 grape shaped knobs, slightly tarnished for the cost of shipping!
I then talked to Mr. Bruce (I take the kids to a woodworking class once a week, he is the most awesome teacher and woodworker, and I now take projects to work on also, and he teaches me along the way) about the best way to go about adding the new knobs.
Step one was to fill the old center hole. I found a dowel rod almost the size of the hole, sanded down the tip, and use a utility knife to trim off a piece that was slightly longer than the thickness of the drawer panel.

Next I pushed the plug I'd cut into the old knob's hole and used a hammer to wedge it further in and then use a bent handle saw (Mr. Bruce has all the good tools!) to trim it flush with the top of the drawer front. Since the new pulls would cover the old holes I didn't bother with filling in the top with wood filler, but when I paint the drawers I probably will.


(Again it won't put the photo in the right orientation!) The only problem I had with this marking, was I noticed that the screws that came with the knobs had a rounded head and would not sit flush with the back of the drawer panel, which would not allow me to replace it on the drawer. I knew I would need to countersink the screw head but wasn't sure any of the tools we had at home were the correct ones for the job, since I wanted them to be equal depth. So Mr. Bruce to the rescue again, with the correct bit on his drill press. But, the counter sink needed to be on the back of the drawer fronts, I had marked the fronts, so I had to redo my process and then drill the countersink holes. While we were setting the drill press up, and getting the proper depth on the hole, we accidentally did the countersink holes on the FRONT of one of the drawer panels. More slices of dowel cut and glued in, then trimmed off.


Since class was over I took the rest home to finish drilling with our hand held drill.

You can see the original hole in the middle, the two countersunk holes for the new pulls, and the smaller holes far right and left that the screws come into from behind to attach the drawer panel to the drawer. All of this is hidden.
Then the final of attaching the fronts back on the drawers. When we moved into this house in 2003 there were no knobs on the cabinets or drawers at all. I drilled and added the pants ripping grape and leaf knobs within the next year. Though I was always short of knobs for the 3 BIG drawers. I still am with these new pulls. I'll just keep searching until I find a good bargain. Until then, I plan to paint the leaf knobs that are on the cabinets with Oil Rubbed Bronze spray paint, distress a little, and wax to make them match the new pulls better.
If you are interested in the old grape knobs, be the first to leave me a comment about them, and I will mail them to you!
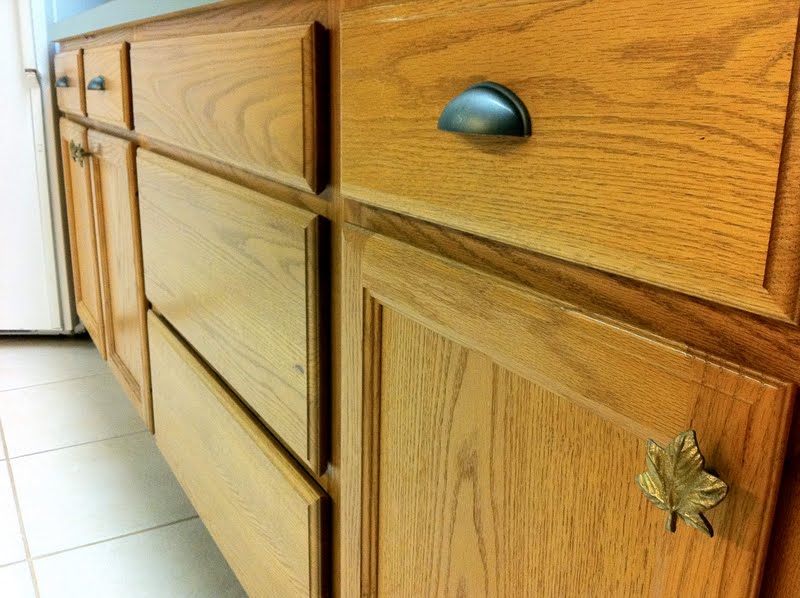
New pulls with drawers with still no knobs and old brass leaf pulls new pulls with old brass leaf knobs painted with Old Rubbed bronze spray paint, distressed and waxed.


I'm linking this to Miss Mustard Seed's Furniture Feature Friday.
(Hopefully!)


What a cool story! Enjoy the new knobs!
ReplyDeleteWhat a great deal! Hope the clothes are happy now. ;-)
ReplyDeleteThank you, what a fantastic DIY! What a great deal on those pulls, & they look great!
ReplyDeleteWow, that was a lot of work . . . but worth it.
ReplyDeleteI am popping over from Sarah's great paint party. (Link #34)
Fondly,
Glenda
I hope you won't be catching yourself on these knobs!! They look great!
ReplyDeleteThank you so much for linking up to my Paint, Please link party.
I've signed up to follow you. I love your kitchen! It looks so sociable.
Sarahx
This is a great tutorial and will be so helpful when I go to put our pulls in the drawers -- love the idea of using a punch to mark the spot for the drill to go!!
ReplyDeleteNow for colors. I wonder if you would post pictures of the newly painted kitchen -- maybe you have? It would be fun to help you decide on colors to paint the cabinets based on your wall color!
Camille